Introduction
Recently, I was given the responsibility to migrate AWS infrastructure from one account to another with a fresh setup. Upon examination, I found that the code was stored in SVN, which contained multiple code bases. My task was to extract only the code relevant to that specific company. And setup the new svn server on new AWS account.
So I created an EC2, and started installing the dependencies to make it happen.
Let's see a brief about SVN:
SVN stands for Subversion. It is an open-source centralized version control system written in Java, licensed under Apache. Software developers use Subversion to maintain current and historical versions of files such as source code.
Let's setup it in 6 easy steps with proper ssl.
- Install Apache2
- Install SVN Package
- Configure Apache2 with SVN
- Create SVN User Accounts, and map access
- Setup reverse Proxy with Nginx
- Setup SSL and Ready to Go
Step 1: Install Apache2
To set up SVN, an HTTP web server is needed. Let's begin by installing Apache2. The following commands will help you install Apache on Ubuntu (22) or on other version.
sudo apt update
sudo apt install apache2 apache2-utils
After successfully installing Apache2, let's now proceed to start and enable it.sudo systemctl start apache2.service
sudo systemctl enable apache2.service
Step 2: Install SVN
Run the command below to install SVN and all the dependencies needed for SVN automatically.
sudo apt-get install subversion libapache2-mod-svn subversion-tools libsvn-dev
After successfully installing SVN and all its dependencies, the next step is to configure and enable the necessary Apache2 modules to ensure that SVN functions seamlessly and efficiently.
sudo a2enmod dav dav_svn
sudo a2enmod headers
sudo service apache2 restart
Step 3: Configure Apache2 with SVN
After the successful installation of Apache and SVN, the next task is to configure them by editing the configuration file. To accomplish this, you can execute the command below to access the configuration file using a command-line text editor.
sudo vim /etc/apache2/sites-available/svn.conf
It will open a new file, and you need to paste the following content in it.
Later you can modify the requited information like server name or other.
<VirtualHost *:8008>
ServerName localhost
ServerAdmin webmaster@localhost
DocumentRoot /var/www/html
CustomLog ${APACHE_LOG_DIR}/svn.log "%t %u %{SVN-ACTION}e" env=SVN- ACTION
RequestHeader edit Destination ^https: http: early
<Location /svn>
DAV svn
SVNParentPath /var/www/svn
AuthType Basic
AuthName "designplus svn"
AuthUserFile /etc/subversion/passwd
AuthzSVNAccessFile /etc/subversion/access
LimitXMLRequestBody 8000000
LimitRequestBody 0
Require valid-user
</Location>
</VirtualHost>
You will think why I am going to use 8008 port or any other port in Virtual host, reason is I want to keep the svn server behind nginx revese proxy.
Let's move to next step.
Change default listening port of apache2 by editing the file located at /etc/apache2/ports.conf like:
sudo vim /etc/apache2/ports.conf
Listen 8008
<IfModule ssl_module>
Listen 443
</IfModule>
<IfModule mod_gnutls.c>
Listen 443
</IfModule>
Let’s Create Repository Now
sudo mkdir /var/www/svn
sudo svnadmin create /var/www/svn/reponame
sudo chown -R www-data:www-data /var/www/svn
sudo chmod -R 775 /var/www/svn
Restart then Apache2 server: sudo service apache2 restart
Step 4: Create SVN User Accounts
When you are planning to create user in svn first see the apache2 virtual host config.
AuthUserFile /etc/subversion/passwd
AuthzSVNAccessFile /etc/subversion/access
These above two files need to be added in /etc/subversion folder. So let's create it with touch command like:
sudo touch /etc/subversion/passwd
sudo touch /etc/subversion/access
Now it's time to add the user and map the access to the user.
To add SVN user will user the blow command:
sudo htpasswd /etc/subversion/passwd admin
sudo htpasswd /etc/subversion/passwd user1
This will add the user in the /etc/subversion/passwd file.

Now map the user in the Repo:
So open /etc/subversion/access
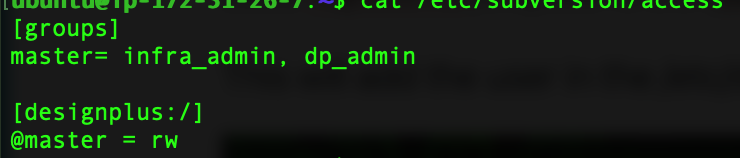
Here define [groups] like
master = user1, user2, user3
dev = dev1,dev2,dev3
QA = qa1,qa2
And in the next map group to repo, like
- [repos1:/]
@master = r
@dev = rw
@qa:r - [repos2:/]
@dev = rw
@qa=r - [repo1:/testing]
@aq = rw
Setup reverse Proxy with Nginx
Now it's time to install the nginx for proxying the apache2 over port 8008.
FIrst need to install it by below command:
sudo apt install nginx
Once nginx is installed need to configure the reverse proxy under
/etc/nginx/sites-available/svn
So, open it in vim or your favourite editor and add the below config
server {
listen *:80;
server_name svndemo .bithost.in; #change your server name as yours
client_max_body_size 10M;
server_tokens off;
location /svn {
proxy_pass http://127.0.0.1:8008;
proxy_read_timeout 300;
proxy_connect_timeout 300;
proxy_send_timeout 300;
}
}
Once you added it in the /etc/nginx/sites-available, now need to link to /etc/nginx/sites-ebabled like:
sudo ln -s /etc/nginx/sites-available/svn /etcnginx/sites-enabled/svn
This will create a soft link and just restart the nginx : sudo service nginx restart
And don't forget to point the your dns on the server. else you will not be able to access with subdomain or domain, you can only acces by IP, if dns not pointed.
You can now access it by http://{your_ip_address}/svn/reponame
Setup SSL and Ready to Go
Up to this point, the setup has been limited to http access, but now it's time to transition to secure https access for svn by setting up SSL certificates and adjusting the nginx configuration. Let's go through the steps together.
- Before proceeding, double-check that you have added the DNS record for the domain or subdomain intended for svn.
- Another way to verify the proper propagation of the DNS you added is by using online tools like DNSstuff or MXToolbox.
- After completing the second step, you can install the certbot tool to obtain a free SSL certificate from providers like zero SSL or Let's Encrypt.
Let's kick things off by installing Certbot.
sudo snap install certbot --classic
Next is to run the certbot for SSL: sudo certbot --nginx

It will require some information, make sure the DNS is correctly set up for the SVN system.
Subsequently, the port 80 server block will be switched to port 443 with the addition of SSL certificates and keys. A redirect to HTTPS (port 443) will be configured for port 80.
Once this is done, your /etc/nginx/sites-enabled/svn file will look like this:
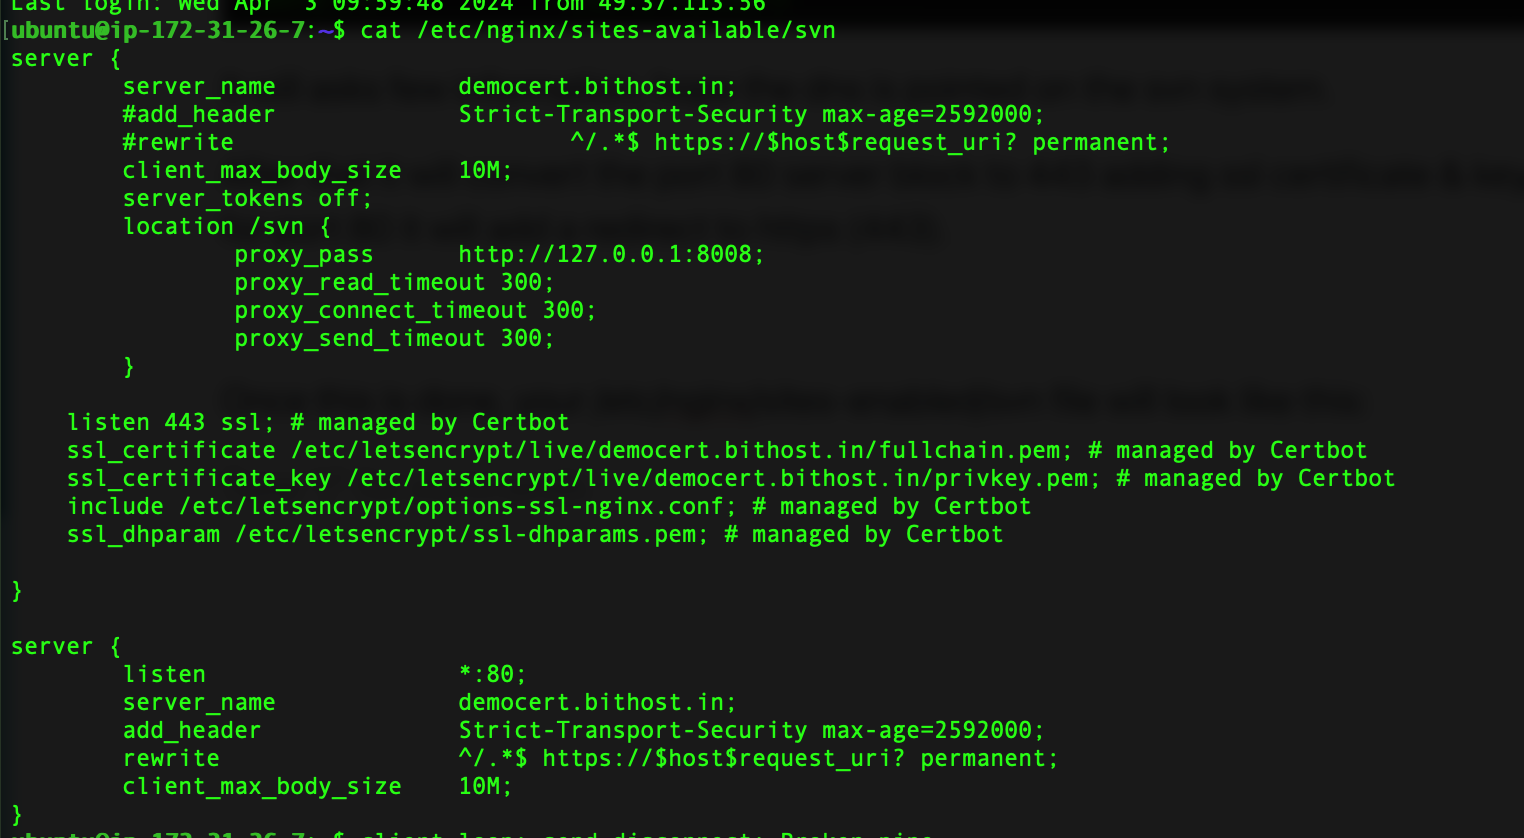
Now your SVN server has been configured to use a secure HTTPS connection.
Hope this helpful :)

Setting Up Your Own SVN Server on Ubuntu 16+ | Complete Guide